Gallery Renee
Fine Art Originals, Limited Edition Giclee Prints, and
Needlepoint Canvases For Sale
Artist Renee FW Lichtman
*Each print comes with a Certificate Of Authenticity
*Preview your prints with Artist Sample Print Cards
*Site Map of Gallery Renee
*Contact Gallery Renee
Hidden Talent Art Galleries Reseller for Prints by Renee Lichtman
Hidden Talent Art Publishing
Publisher and Distributor of Fine Art Giclee Prints and Needlepoint Canvases by Renee Lichtman
Ballpoint Pen Technique - Using Ballpoint Pens For Art
Use ballpoint pens to create masterful works of art
Ballpoint pens can be an excellent medium for serious fine art or illustration. An obvious advantage is precision and control. With pens you can achieve very tight renderings. However that's not all they can do. Ballpoint pens can also be used to express any mood, thought, theme or subject matter. Rendering does not need to be precise to accomplish good works with this medium. Wherever you may stand on the validity of ballpoint as an art medium the following essay and illustrations will provide you with a working knowledge of how it's done.
|
A Quick Outline |
|
1 |
Start with a light pencil outline drawing on heavy watercolor paper. |
2 |
Draw over the outline lightly with ballpoint ink. |
3 |
Erase the pencil outlines. |
4 |
Use light parallel lines to block in the base color layer. |
5 |
Then change(crosshatch) directions for the next layer. |
6 |
Work from light to dark. The lightest area will have only one or two layers of ink but the darkest may have five or six. |
7 |
Use black for shadows very carefully. |
8 |
Highlight your deepest shadow areas with a solid slightly wider ink line. |
|
9 |
Page down for an illustration. |
Most artists start their compositions with a sketch or a series of sketches. This helps them visualize and plan the art work. Painters transfer a copy of the sketch they are using to canvas or watercolor paper using pencil or charcoal. For ballpoint pen drawings start with a light pencil outline drawing on watercolor paper.
It is important to use a good quality heavy weight paper like watercolor paper when you begin your art work. In my earlier drawings I used light weight drawing papers and the paper developed ripples that were clearly visible when the drawings were scanned. The is because as you work you will go over an area many times and this causes the paper to warp and stretch leaving you with ripples.
Do not shade your pencil sketch, the graphite gets mixed onto the ballpoint pen nib clogging your pen and muddying your ink colors. Once your outline is down, go over it very lightly with your ballpoint pen. Then erase the pencil lines. You can use graphite with pen as a mixed media side by side or after the ballpoint ink is down but not as an under drawing to the ballpoint pen ink.
Practice using your ballpoint pens. We tend to think that ballpoint pens can't create a variety of lines. This is because we usually use them the same way on the same paper every time we write. The same pen can give you different lines depending on how you use it especially when you use a thicker softer paper. First try pressing down hard to get a dark firm line. Next try using a lighter pressure to get a thinner lighter line. Also important to practice for using ballpoint pens in art work are the curve or lack of curve in your lines. A series of parallel curved lines can help build contour and will add depth to your work. Small blocks of short parallel lines will give you a flat looking area with a lot of texture.
Don't try to color areas in as if
you are using crayons, instead use a crosshatching technique and build your
color in layers. Solid ballpoint ink becomes a dead issue if you try to draw
back into it; so be sure that's what you want in your drawing before you do it. It takes patience
but crosshatching will give you the opportunity to change colors and create
shading and texture. Save any solidly colored areas for last. This gives you the
freedom to change your mind.
With light parallel strokes, draw in the base color of each region in the
drawing. This is similar to blocking in colors in an oil or acrylic painting and
adding details or shading on top of that. Although I have not tried it yet it is
possible to tone an area of paper with another medium before beginning to ink
it. The choices however, are limited. You can't use anything chalky which can
clog your ballpoint pens and smear. You can't use anything waxy like crayons
because the inks must make contact with the paper and again the wax can clog your
ballpoint pen. That leaves markers or watercolors. Try using them in a even coat
without saturating the paper. Using an under color can represent the final ink
color or be another color designed to tone, enhance, or change your final color.
Work from lightest to darkest by adding layers of ink over the base color. The lightest areas may have only one layer of ink the base color by its self, but darker areas may have five or six. Change your stroke directions for each layer of ink. Remember what you practiced, using more or less pressure on a ballpoint pen has an effect on the amount of ink it deposits. Use more pressure in darker areas and less in light areas.
To get strong, interesting colors you will need to use many layers of ink. Colors can be modified by combining different ink colors. Work one color into the other with light strokes and change line directions to achieve a crosshatched texture. This will help blend the layers of color and ink more smoothly.
Depth and dimension can be created by careful shading. If you think of your drawing as being three dimensional and remember how light changes as it crosses a shape you will have more success portraying three dimensions. An added advantage of using ballpoint pen is that your shading lines need not be straight they can curve to help define the contour of an object.
Working in a very well controlled layer of black ballpoint ink will help to deepen shadows. Leave it subtle unless you want to accomplish a gloomy or darkened emotional component to your work. Highlight your deepest shadow areas with slightly exaggerated outlines and blend them in.
A printed image is made of dots of ink. (Dots Per Inch DPI ) The display on your computer is created by dots of colored light, called pixels, as well. (Pixels Per Inch PPI) Impressionists use small brush strokes laid next to each other to create their paintings. Pointillists use round dots of paint for theirs. The lines of a ballpoint pen laid down next to each other and over each other create an image in a way that is not different from those other techniques. You are attempting to take many small units and blend them into one image. Ballpoint pens can easily be adapted to create works of art.
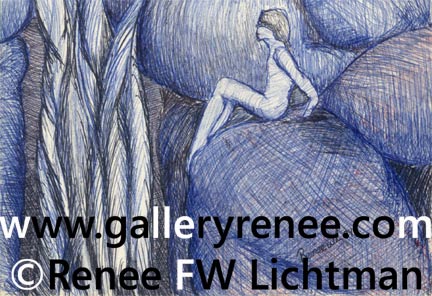
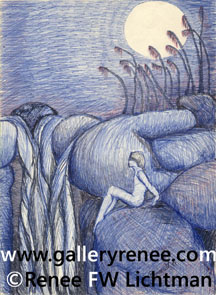
In this detail from the drawing Rock Nymph you can see the technique described above.
The very light nymph figure has only one layer of ballpoint lines. The lines are laid in a parallel pattern and in most areas follow the body contour.
The large boulder directly behind the figure is darker. The effect was gotten by spacing the parallel lines more closely together and using more pressure on the pen. There is crosshatching on the bottom shadow area of the boulder.
The boulder on which the figure is seated has four layers of ink on it's lightest area with each layer going in a different direction. Additional layers plus black were worked into the shadow areas and the edges were outlined especially along the shadow side.
Ballpoint Pen Art Gallery - Original Art and Limited Edition Giclee Prints
Forward to the Next Article at Gallery Renee
"Title List Renee Lichtman's
Images by Title"
Back to the Last Article at Gallery Renee
"Site Map of Gallery Renee"
See More Art Galleries from Gallery Renee
Site Map of Gallery Renee
Contact Gallery Renee
Sign up for the HiddenTalent Art Gallery Newsletter for information on Renee
Lichtman and other talented artists